Tuesday 24 September 2013

Exhaust Bolt Holes Dilemma

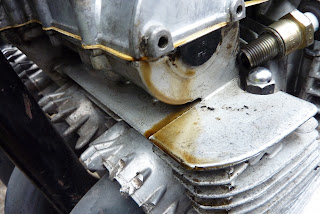
You might have seen earlier in the blog, that the PO of this bike had used 2 or 3 different types and lengths of bolts to secure the 4 - 1 exhaust.  It seems that the securing flanges on this exhaust are wider than the originals and in order to get a good fixing, some longer bolts and different numbers of washes were used.  This is what I found:
Securing flanges:

Also there was only one exhaust gasket which was located on the no.4 cylinder.

But I also found that when I took off the headers, although all the bolt holes had the same depth, some of the bolt holes would only allow a bolt to be screwed in 6 turns, whereas other holes allowed up to 14 turns.  So this was the first hole (6 turns only until it was tight):
 And this was another bolt hole that allowed 14 turns.  You can see the same bolt beds in a lot further:
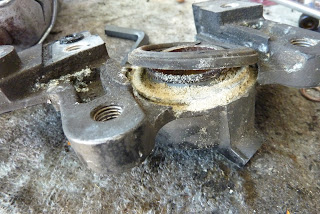
So I was thinking (since the hole depths were the same) there must be something wrong with the threads.  I tried to tap it out.  It was very stiff and I only managed 3 or 4 turns and all this came out:
I don't want to continue this exercise for fear of damaging the bolt holes completely.  Should I keep tapping it in?   

Monday 23 September 2013

First Test Ride (30 Miles)

Been a long time since I rode my own bike (maybe 20 years) but I have ridden a few belonging to other people very briefly.

I was suspicious of my new brakes and if I had bled them correctly but all seemed well after a few miles although it would be very hard to lock the back brake and impossible to lock the front one in dry conditions.

The motor ran pretty good (especially after I switched to reserve!) but not as sweet as I seem to remember they are capable of being.

When I got back I decided to take off the exhaust pipes to see if I could fix the "blowing" problem on no.4 and to see about these different length exhaust bolts.


No.1
No.2
No. 3

No. 4
It's no. 1 that sooting up and look at this video of it running without the headers.  See no. 1 spit fire at me right at the end:


Saturday 14 September 2013

More New Parts

Just when you thought you were nearly there; you need some more parts.  More brake parts arrived at Robinsons today.

Not So Good Rear Brake Torque Arm Bolt

Checking over the rear brake as I was putting it back together and I looked to me like the PO had substituted a different kind of bolt on the caliper torque arm.  I am not engineer but even I understand that this bolt is going to be subject to a significant amount of shear under full braking.  Would you trust a regular bolt from a hardware store?  No neither would I.  So I stole the bolt from my other GS1100 project and bought a new one to put on that one.

 The one on the right is more likely to hold - don't you think?


Thursday 12 September 2013

Brake Piston

Is this brake piston serviceable?


There is conflicting advice about the serviceability of these pistons.  Some would say don't use them again but other (see below) say they would be OK.

This is an extract from the GS Resources Brake Refurbishment Tutorial:


Wednesday 11 September 2013

Why Don't The Brakes Work?

I thought I ought to have a look at the brakes.
 This could be the reason they are not working very well.


 Practically baked in.
 
 Managed to get this rear piston out OK. 

 But the other side of the rear caliper was a little more tricky.


It came out in the end.
And look at the carnage someone had inflicted on these poor pistons last time they were taken out.


In the bath with you lot.


Tuesday 3 September 2013

Exhaust Bolts

I wanted to check what was happening to the exhaust bolts and to see if I could find the reason for the noise which sounded like something was blowing.  So I decided to get all the exhaust bolts out.

This is the motley selection of bolts. Hex bolts and standard bolts with out without one, two or three washers.  Also quite a bit of this grey cement stuff has been used to fill in the gaps and stop the blowing.  It's not working!

 If you look closely at the bottom of the threads you will see that only a small proportion of the thread is being used to hold the bolt in.  The poor condition of the remainder of the thread is because it has been exposed to the elements and not bolted down into the head.  And the reason for that is..............

 an extra large exhaust flange ring.  Probably the exhaust pipes are too small in diameter so a spacer has been added but it is a litte too thick which prevents the regular bolts from biting too deeply into their bolt holes.


In two of the bolt holes the very first few threads have been stripped which now means even with the extra long standard bolts there is only 2 turns of bite.  Not enough me thinks.


New Cam Gasket and D Plugs

After doing the valve clearances we put on a new gasket and D plugs.


 But I still had an oil leak in exactly the same place - so off with the cam cover again.
 Can't see any problem.


I put it all back together again and used some gasket compound around the leaking area and the D plug.  That stopped the oil.

Sunday 1 September 2013

Re-Instal Carburetors

 You need about 3 pairs of hands to get the carbs back on so I experimented with some wood.


 This might just do it.  The trick is to apply an even amount of pressure to both sides at the same time and grease up the boots as well.

 Then I discovered the awful truth.  I have assembled the choke mechanism with the return spring between carbs 2 and 3 and not between 3 and 4.  So pull them all off, change the assembly and put them back on again.  1.5 hours.


 Ready to go.  On no.  Carbs don't line up with the airbox because engine to carbs boots are on upside down.  Rookie mistake.  Another hour!